What do you need to know about installing a reverse osmosis system
The reasons for purchasing a water filter are quite obvious, neither the water supplied from the city utilities nor from a well or from a borehole usually does not meet the drinking quality required by the standard. Normal water flow filters, let alone jug filters, do not provide complete water treatment. If you want to make yourself filtered water for the water system of the whole house (including technical water), you will need to make an analysis of water quality in order to select the most effective filtering materials.
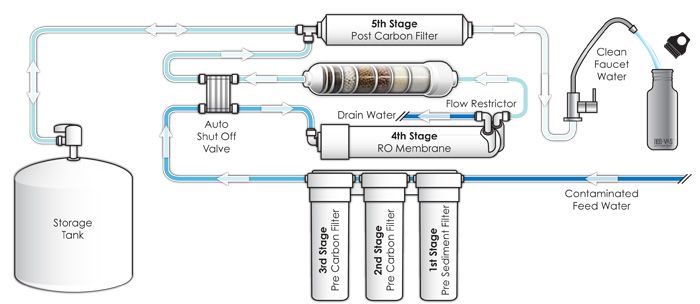
However, if you only want to clean drinking water, you can safely take the reverse osmosis filter that is installed for washing. Three pre-filters remove sand, rust, sludge, aggressive chemicals and other mechanical contaminants from the water. The RO membrane removes all remaining contaminants, bringing the water to a state close to chemical purity. After that, the post-filter and mineralizer “restore” the taste of water, bringing chemically pure water to a state optimal for human consumption. If you want to do it right, it is easier to use the service of ispring reverse osmosis installation in New York.
Preparing to install the filter
So, you’ve already bought a reverse osmosis system for your home and decided to do the installation yourself in order to save some money. For convenience, we will consider in our article an example of installing a reverse osmosis filter in a maximum configuration, which does not require the purchase of components. When you open the box you will find – three flasks of pre-filters, filter housing with mounting bracket, reverse osmosis membrane, post-filter, mineralizer, 4-way valve, tap for clean water, flexible piping, coupling and tap for tapping into your water system, storage tank, tap for tank, clamp and key for replacing cartridges in the flasks of pre-filters. Naturally, you will also find installation documentation and warranty documentation.

You will also need a modest set of tools consisting of drill, knife, fumigation tape and adjustable wrench. Most people have or can take these tools from friends, relatives, and neighbors. Ideally, it is a good idea to have a pressure gauge to check the water pressure, but later on.
First start of the filter
After installation is complete, you can start the first test run of the filter. To do this, you will need to follow a simple sequence of steps:
- close the tap of the storage tank;
- open the tap of tap water and clean water in the sink;
This takes less than ten minutes to release the remaining air from the system, provided the water pressure is normal (3.5 atm).
Why do you have to shut off the tank faucet?
So that the water from the filter flushing does not remain inside the tank. For complete rinsing, it takes about fifteen minutes to drain the fresh water tap. Now you can start rinsing the tank, you need to open the tap of the storage tank to collect clean drinking water and the system works in the normal mode. Depending on the water pressure, this can take about an hour. After that, all water must be drained from the tank. Also do not forget that the resource of pre-filters of water, depending on the intensity of use and water quality, is from 3 to 6 months. And it means that you need to have cartridges for reverse osmosis in stock, in order to replace them if necessary. After all, the service life of an expensive membrane depends on the quality of their work.
It is important to note that if you have water pressure less than 3.5 atmospheres, the reverse osmosis filter will not be able to fully purify the water. In this case, it is better to worry in advance about buying a reverse osmosis system which already includes a pump. It does not require any adjustment and will work in automatic mode increasing the pressure for normal operation of the reverse osmosis system. If all this looks complicated to you, then use the services of professionals to install apec water filter https://www.highwaterstandard.com/apec-water-filter-installation-nyc.


